
Why the attic is the worst place for an air handler
Builders put air handlers in attics to save closet space. In South Florida that decision has a cost. A summer attic can run well above the outdoor temperature, and the air up there is loaded with moisture. The air handler cabinet and the supply ducts that leave it are full of cold, dehumidified air. Cold metal in hot, humid air is a recipe for condensation.
The cabinet is insulated, but the insulation is never perfect. Seams, access panels, refrigerant lines, the plenum where the ducts connect, and the primary drain line all become cold spots. Water forms on them the same way it forms on a glass of iced tea left on a patio table. We call it sweating, and it is the most common reason an attic air handler causes a mold problem.
The second reason is the drain. Every air handler pulls water out of the air as it cools it. On a humid day a residential system can produce several gallons of condensate, and all of it has to leave through a small PVC line. When that line clogs with algae, dust or insulation debris, the water has nowhere to go.
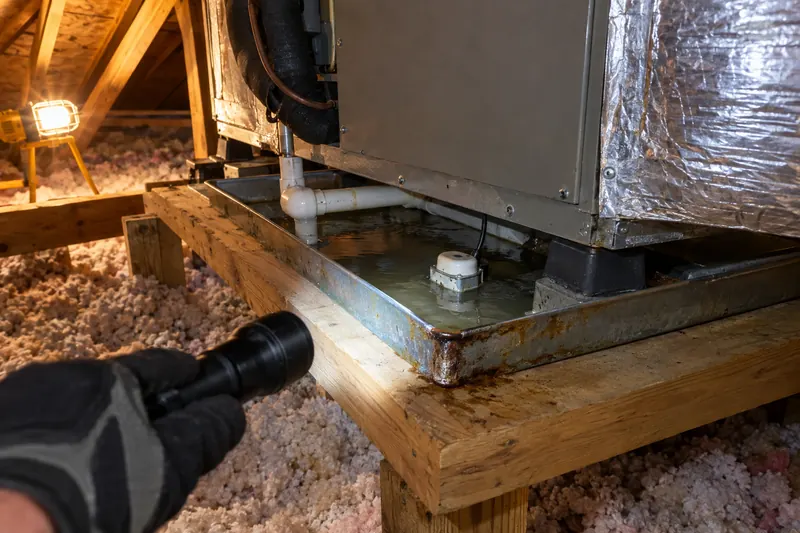
What the secondary drain pan and float switch do
Because the primary drain will eventually clog, code requires a backup for any air handler installed above a finished ceiling. There are two parts to that backup, and we check both on every attic inspection.
- The secondary drain pan. A shallow metal or plastic tray that sits under the whole air handler. If the primary drain backs up and the internal pan overflows, the water should land here instead of on your drywall. The pan usually has its own drain line that runs to an outside wall, often ending in a small pipe stub under the eave. If you ever see water dripping from that stub, the primary drain has already failed.
- The float switch. A small sensor mounted in the secondary pan or on the primary drain line. When water rises past its trigger point, it cuts power to the system. The idea is simple: a system that is off stops making water. If your air conditioner shuts down on a hot afternoon for no clear reason, the float switch may be doing its job.
On inspections we often see the backup system defeated. The secondary pan is rusted through. The pan drain line was never connected, or it runs uphill. The float switch was bypassed by a previous technician who got tired of the system tripping. Or there is no pan at all, because the unit was replaced and the installer set it on a platform without one. Any of these means the ceiling is the next line of defense.
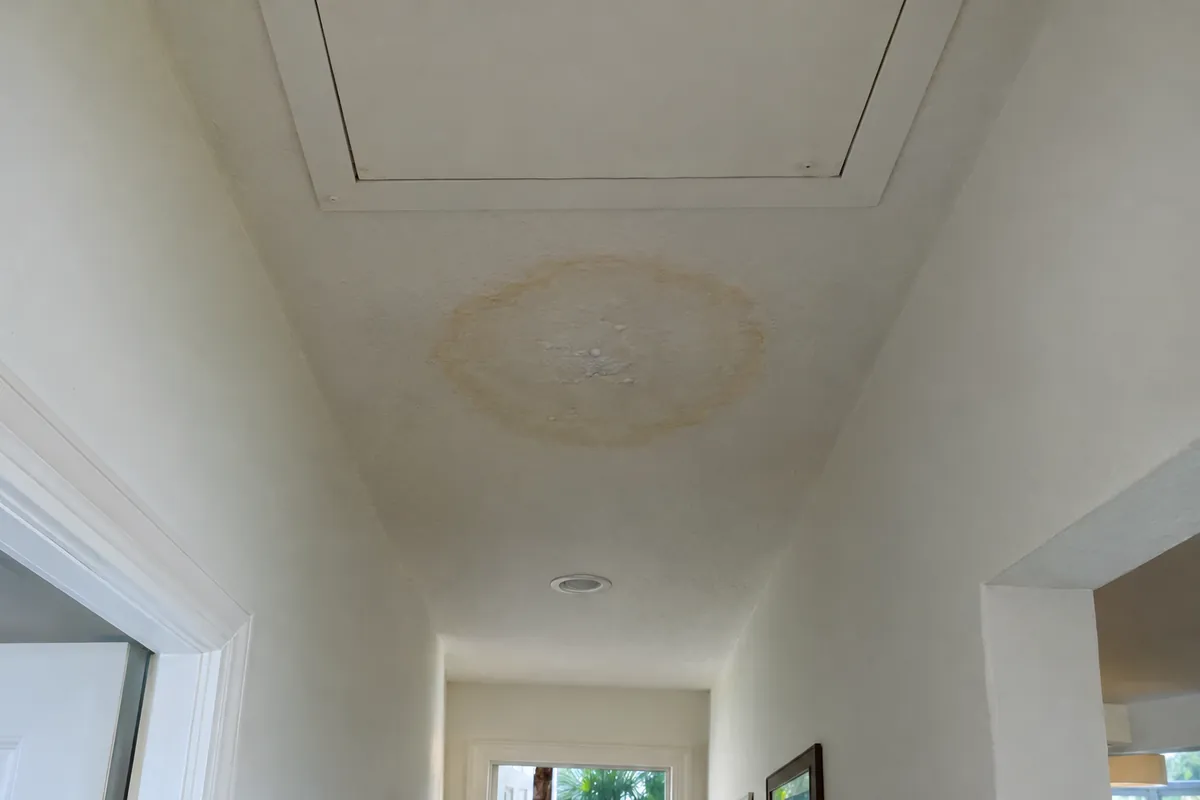
The ceiling stain under the unit
The first sign most homeowners get is a tan or brown ring on the ceiling, usually in a hallway or closet near where the air handler sits above. The stain often appears, dries, and then comes back larger. That cycle tells us something: the leak is intermittent, which fits a drain that backs up when the system runs hard and clears a little when it rests.
A few things we look for around that stain:
- Is the drywall soft when pressed gently? Paper-faced gypsum that has been wet repeatedly loses its stiffness.
- Is there a sag or bubble in the paint? Water pools above the paint film before it comes through.
- Does a moisture meter read elevated in the ceiling compared to a dry spot a few feet away? A stain that has fully dried will read the same as the surrounding ceiling. A stain that reads high is still being fed.
- Is the attic insulation above the stain wet, compacted or discolored? Blown insulation holds water like a sponge and keeps the drywall below it damp long after the drip stops.
Mold can begin growing on wet gypsum and paper within 24 to 48 hours. A ceiling stain that has been coming and going for a season has had plenty of time. The visible stain is often smaller than the wet area behind it, which is why we meter well beyond the edge of the discoloration.
How we inspect a system you cannot easily see
A ceiling stain is a symptom, not a diagnosis. To find the cause we go into the attic, and we bring the same tools we use everywhere else.
- Visual check of the cabinet and connections. We look at the seams, the filter access, the refrigerant line insulation, and the supply plenum for water marks, rust streaks and droplets. Sweating leaves a distinct pattern: a wet band along the bottom edge of a cold surface, or drips directly below a joint.
- The drain lines. We trace the primary line from the unit to where it exits. We look for a trap, a cleanout tee, and a proper downhill slope. We check the secondary pan line separately. If the pan has standing water or a dried ring of mineral deposits, the primary has overflowed before.
- The float switch. We confirm there is one, that it is wired, and that it sits in the right spot. A switch mounted above the overflow point of the pan is decorative.
- Moisture readings. We meter the platform the unit sits on, the ceiling joists around it, and the drywall below, from the attic side where we can.
- Duct inspection. Where the flexible ducts connect to the plenum is a common cold spot. Sweating here drips onto the ceiling along the duct run, which can produce stains in rooms that seem unrelated to the air handler.
- Air sampling where it is warranted. If there is visible growth or a wet area we cannot fully see behind, we may take air samples at the supply register nearest the unit and compare them with an outdoor control. The sampling pump runs at 15 liters per minute for a fixed time, and the lab tells us what was in the air. Our earlier post on how to read a mold inspection report explains what those results look like.
The whole point of an attic inspection is to answer three questions: where is the water coming from, how long has it been happening, and what has it wet. The report will say which materials are affected and whether they can be dried and kept or need to come out.
What you can do before we arrive
A few things are safe for any homeowner to do and will help the inspection.
- Find the secondary drain stub outside, usually under the eave on the side of the house closest to the air handler. Note whether it is dripping.
- Check whether the system has been shutting itself off. Note the dates if you can.
- Photograph the ceiling stain today and again in a week. Growth or a return after drying is useful information.
- Keep the indoor humidity under 60 percent with the system running normally. If a float switch has tripped and the house has been without cooling, humidity will climb quickly. Our post on the 60 percent rule covers why that matters.
- Do not cut into the ceiling yourself. Opening a wet cavity without containment spreads whatever is in it.
If the stain is new and you know when the drip started, it is worth acting inside the first two days. The window is short and the cost of waiting is more material coming out later.
If the inspection finds mold
Our role ends with the assessment. Under Florida law a licensed mold assessor cannot remediate a property they assessed, so the report goes to a separate licensed remediator who follows the written protocol. That protocol will typically call for the affected drywall to be removed, usually to a clean margin beyond the wet area, the insulation above it to be replaced, and the air handler drain problem to be corrected by an HVAC contractor before the ceiling is closed. Fixing the ceiling without fixing the drain just resets the clock. You can read more about what remediation involves and what we check on the clearance visit afterward.
If you have a ceiling stain near where your air handler sits, or a system that keeps shutting off, request an inspection or call us in Palm Beach at 561-303-0130.